Hopes and Seams

Crafts, refashions, and sewings to DIY my way through life

Entryway Mail Holder

Apparently I got lost during the holidays. My last post was about approaching fall, and now… didn’t we just celebrate the first day of spring this past week? 🙂

I haven’t had much time to do anything “extra” these days. Life is full – a happy full! – so I don’t have much to show here. One of the few project I was able to do, though, was to make the perfect little mail holder. I searched high and low, everywhere I went, for something that would hold papers (outgoing mail, coupons, important receipts) on the wall of our entry way. I had really particular dimensions and a craving for something with personality, which was apparently too much to ask because I wasn’t finding anything. Finally I looked at a cardboard box we were throwing away and figured, “why not?”

20140310-102725.jpg

So a cardboard box, a thrift store sheet, some clothesline and some left over yellow p0mpom trim turned into this funky little thing…

20140310-151628.jpg

and after hanging a magnetized whiteboard tile above it, our entry way is a heck of a lot more functional 🙂

20140310-151639.jpg

20140310-151647.jpg🙂

I have pics of the step by step…but it’s pretty self explanatory, no?

Hope everyone is basking in the goodness of God, manifested in perfect temperatures, happy blooms, and sun-shiny days.

20140310-151602.jpgoh yellow pom poms….you slay me!

Goodbye Summer, Hello Fall – Bleach Dyed Dress

All summer long, I had eyed a number of bleach dyed tops, skirts, and jackets, but didn’t want to spend the cash for anything new. So I put bleach dyeing something for myself on my summer to-do list. By the time I was done, it was fall! 🙂

a blue a linen sack I could find

as blue a linen sack I could find

I started with this linen dress I found at the thrift store for $3. I thought the cobalt blue was so pretty, and the pockets were interesting. But everything else needed some changing…!!!

alterationsI did a number of pretty standard alterations:

  1. marked at my natural waist and cut
  2. brought in the sides and sleeves, trimming off the excess
  3. resized the new skirt by making 6 uniform box pleats. I considered just gathering it like I have before, but the fabric is a bit thicker and I thought pleats would be faster to do

IMG_1909-001After that, I sewed the new bodice and skirt back together: I matched them up at the waist seam, with the right sides facing each other.

IMG_1921-001It was already MUCH improved. But I knew this little gem had more to show!

bleach dye materials

Needed: big bowl or bucket, sponge, GLOVES, straight up bleach, concrete slab or giant table covered with tarp (not kidding)

I got my materials together and found a nice flat concrete area to work on. Some notes on the materials and work space:

  1. I needed a large surface area that was flat, big enough for me to lay the entire dress out without wrinkling
  2. The work space needed to be something I could drip undiluted bleach all over. The concrete outside my front door was perfect after I made sure it was clean of debris, but I would have used a tarp on a big table if I needed an alternative.
  3. I was dip-dyeing my dress first, so I chose to use a smaller, narrower bowl versus a wide bucket because I didn’t want to pour more bleach than I would need to saturate the hem of dress.
  4. I had a big soft sponge, the kind you shine cars with, but a smaller sponge would have been fine too.

Starred Photos5I started with the hem: I kind of rolled my dress up so that it would fit the width of the bowl, being VERY CAREFUL that the hem was uniform all along the bottom, and put my gloves on. After filling my bowl about 4 inches deep with the bleach, I lowered the dress in until it was standing on the bottom of the bowl with the surface of bleach reaching 4 inches up the hem, and “creeping” up. 

One thing I didn’t know about bleach dyeing is that the bleach does not change the color of the fabric right away. I thought that the moment the fabric would hit the bleach, it would turn white. So it was rather anticlimactic when I built up all this courage to finally dip the dress and it didn’t change color at all and just looked…wet. I held it in there for a good 4-5 minutes, and it only changed to a pinkish color! I was bummed. But when I took it out and lay it carefully down, it started to turn whiter and whiter as it dried! So I ended up dipping it once for a few minutes, and then letting it dry for about 10, and then dipping it one more time for another 4-5 minutes to make sure the hem was as white as can be.

Starred Photos6

front and back splatters

I couldn’t get any action shots of the next steps because I was, well, in action 😦 but after getting the hem all white, I wanted to have a splatter effect that grades up the dress. I put my gloves back on, and tried my best to get the skirt as flat and even and unwrinkled as humanly possible. I took the sponge and filled it with the bleach in the bowl – not completely soaked so it’s dripping full, but full enough to squeeze a good cup full at a time.

With my sponge loaded, I held it over the area nearest the hem, and SLOWLY squeezed the bleach out, carefully splattering it in a somewhat uniform way. I did the first liberal squeeze onto the bottom of the dress, and then did the smaller drops for the area a little above, so the drops get smaller and smaller.

After that, I literally just cupped a little bleach in my gloved hands and trickled it along the middle – the area between the hem and waist – of the skirt. Finally, for the top part, I wet my gloves in the bleach, and let it drip off my fingertips for larger drops, or flicked my fingers to get the small drops along and above the waistline.

LEARN FROM MY MISTAKES: It’s REALLY IMPORTANT for the dress to be flat!!! The bleach pooled along even the slightest fold and wrinkle, making pooly lines of bleach instead of the more roundish splatters I wanted. I was able to fix it by adding MORE bleach to round them out, but I wish I had been more careful from the beginning.

Again, it only turns white after it completely dries, so after letting it dry, I took another look at it, and did “touch ups” with my gloves until it had just the right amount of splatters. After that, it was another 20 minutes to air dry completely, an express spin in the washer and dryer and…

bleach dress 1

dumb pose #1

my new fall dress with old summer trends! 🙂 On an unrelated note, my husband made the credenza behind me. Isn’t he cool? I always say HE should be writing a blog.

bleach dress back and front

back and front or dumb pose #2 and #3

bleach dress close up

bleach flowers

I reallyyyyyy LOVE how the splatters look up close. There’s something almost floral about the pattern!

before during after

before – progress – after

The end! Husband always chides me for taking “ugly” before pictures and then trying to look super great in the after pics. He says it’s manipulative. So here’s a before/during/after pic to fairly represent the state of things. See – I’m happy allll the way through!

little boy bloopers

🙂 and this makes me happy too.

Geometric Wood Block Curtain Tie Backs!

What a mouth full!

1. Start with cubes. These are about 3.5 inch wide/long/high. I cut them from some scrap post we had.

IMG_21582. Sand or cut all the corners off. Sanding will take forever, but if you cut with a saw, make sure the whole thing is stabilized before you make any cuts or else it may or may not fly out of your hand at 100 miles an hour and ricochet and kill you. Almost. IMG_2161

Cut generously and irregularly for a neato faceted look.

You COULD stop there but if you want to, you could also…

3. Tape off and paint any of the faces your favorite color(s)

IMG_2165

Once you let dry and rip off the tape, you could use these little pretties as paper weights, or just decorative accents.

IMG_2202

Once again, you COULD stop there. But honestly, the entire reason I wanted to make these was so I could do this….

4. Drill a 1/2 inch wide hole about a half inch deep into the center. It’s ideal to find a face to drill into that has a face parallel to it – that way you have one face flat on the ground, nice and stable, while on top you have a flat face to drive the drill bit into at a 90 degree angle.

IMG_21625. Buy industrial pipe flanges (for 1/2 inch pipes) and nipples (again, 1/2 inch. The one I got is 3.5 inches long). Screw them together.

IMG_2203

You can spray paint these if you want!

6. Carefully “screw” on the wooden geode onto the pipe

IMG_22047. Position and screw into either side of a curtained window.

IMG_2209Geometric wooden block curtain tie backs!

I really loOOooOOoOve them, but I go back and forth between whether they are too big or not. Part of me likes how gimango they are because it’s a real accent on either side of the curtains and the feel playful/whimsical. But another part of me wonders whether it looks silly :/

IMG_2212

What do you guys think? Big and dumb or playful and fun? 🙂

Pink Granny Dress

Anyone who knows me knows I like ugly things I have an unconventional aesthetic. “That’s really ugly/weird,” they say, “but somehow it suits you.”

So when I saw a pale pink, polyester dress with granny pleats past my knees, long sleeves with not one, but TWO sets of shoulder pads, and a neck hole that barely went over my head with a lace bib attached, I literally gasped in glee.

omgiloveyou

omgiloveyou

I LOVED the pleated skirt, the blouson quality of the top, and the vintage look of the fabric/print, and I knew all the things I didn’t like – the neck line and the sleeves – could easily be changed. Do you see the potential?!

DSC_0662

I have to tell you, though, that lace bib is destined for greatness.

With scissors and seam ripper in hand, off came the lace bib, the sleeves, the 2 sets of shoulder pads

DSC_0665 (2)

I opened up the front and back of the neck hole, following the line of the existing interfacing as a guide. You could also use a shirt you already have as a guide to make sure the neck isn’t cut too big.

in z formation - finished arm holes, paper fabric and interfacing cut, interfacing ironed on to fabric, finished neck hole

in z formation – finished arm holes, paper fabric and interfacing cut, interfacing ironed on to fabric, finished neck hole

I finished the open arm holes by rolling over twice, pressing, and stitching in place. I decided to finish the neck with interfacing (my first time!) so I made a paper template for the front and back, used it to cut my fabric (I used the extra fabric from the sleeves) and the interfacing, and ironed the interfacing onto my fabric. I then lined it up with my neck hole, right sides together, sewed around the edge, then folded the interfaced piece so it was on the inside of the garment with the wrong sides together, pressed, and topstitched in place. It turned out well!

DSC_0915

and I was DONE!

Starred Photos2

the deets

light, summery, pretty!

Starred Photos

Happy either way 🙂

Starred Photos1

before and after

The end!

Painted Ombre Curtains

IMG_1794

The very first thing we did when we moved into our house was paint all the walls. Every room was painted a different color (bright blue bedroom, pink bathroom, peach kitchen, green master!) so to unify everything and establish a neutral palette I chose to sweep everything in the neutral paint color du jour – grey. Convinced there would be pops of color elsewhere, we proceeded to get the rest of the big furniture in the living room – a sectional sofa, a large area rug, and book cases/expedit shelving units. What colors did those end up being? Dark grey, grey, and black, respectively. Even my sofa “accent” pillows ended up being grey. I was starting to feel very drab indeed.

I searched and searched for some bright cheery yellow curtains but I learned quickly that I’m painfully particular – I wanted a print, but I didn’t want it all over. I wanted ombre, but I thought it too plain by itself. I wanted a bright, loud color, but didn’t want it to be solid. And underlying it all was the painful squeeze of now paying a mortgage through our noses.

Amidst my woe, I serendipitously checked the “As-is” section at IKEA and found a pair of these for $5!(!!!!!) After reading a bajillion tutorials on how to dip dye fabric AND how to paint a pattern onto fabric (like this one), I just jumped in and tried it myself. For the most part, I’m pleased with the end product, but there are DEFINITELY things I wish I had done differently.

DYEING

IMG_0500

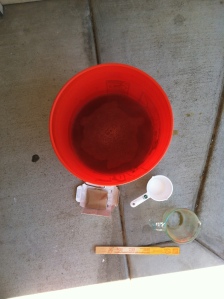
I used 1 entire package of RIT Golden Yellow, and dissolved it with a cup of salt in about 3 gallons of boiling hot water. In retrospect, I wish I had done 2 packages? Or maybe tried mixing it with the tiiiniest hint of orange, just because I wish the yellow were just a tad bit more saturated. I think my curtain fabric (a sort of canvas-y material) was too thick to take on the dye to the degree I wanted. Oh well!

house stuff-001

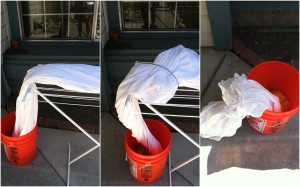
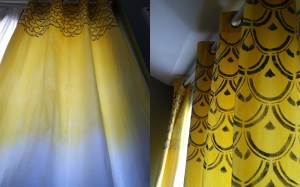
I then lowered the ends of my curtains into the bucket until they skimmed the bottom. I let the ends steep for about 15 minutes, and then lowered another foot into the bucket. I kind of twist scrunched the fabric to make it fit more efficiently in the water and make sure the dye line would be level horizontally across the fabric. I repeated this process of lowering a foot of fabric in and letting it soak for 15 minutes about 4 times. For the last “wash” where the yellow is the lightest and transitions into the white, I just dipped it quickly a couple times instead of letting it soak.

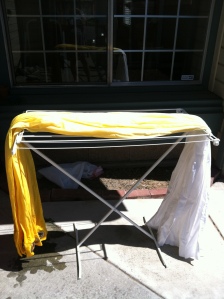
When I pulled it out, the end at the bottom of the bucket was the darkest shade of yellow since it had sat in the dye for more than hour, while the part right next to the white was the very lightest since it was just dipped really quickly. I carefully hung the curtains across my fence (making sure the color was at the bottom!) and ran cold water with the hose from the top (white) to the bottom (yellow) until the water ran clear. I let it air dry, and then threw it in my dryer to set it!

IMG_0504

What did I do during those 15 minute intervals?

PAINTING

With some left over wall paint, a homemade stencil, a sponge, newspaper, spray adhesive, scotch tape, and a couple paper plates on hand, I started figuring out how to paint the pattern onto my curtains.

I sketched out a few patterns that I thought I might like, and once I decided on one, I drew it out on some stencil material and made my cuts with an Xacto-knife. I sprayed the back with spray adhesive (it gives the back of the stencil some tackiness), and also stuck four pieces of scotch tape on each side to help secure it and keep it in place.

house stuff2

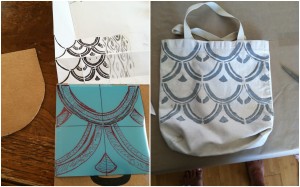
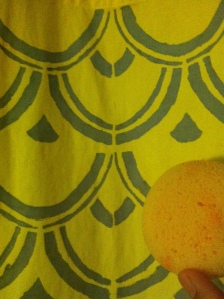
After practicing on a tote to get the feel of things, I laid newspaper under the curtain fabric and got to work. The process was to position the stencil, stick down the scotch tape, load up my sponge and blot off excess on a paper plate, apply onto the stencil evenly, carefully peel off and wipe off the excess paint on a paper plate. Rinse and repeat.

photo (3)

I’m not going to lie, the stenciling and painting was a PAIN and it took forever (forever = maybe 4 hours?). There are a lot of things I would do differently if I were to do this over.

WHAT I WOULD DO DIFFERENTLY

This was a roll of “make your own stencil” material from Martha Stewart that I got from Michaels. I would NOT (!!!!) recommend using this!!! It was rolled so tightly, that once I tried to unfurl it to use for myself, the dumb thing would NOT lie flat, even after rolling it as tight as I could the opposite way. If I were to do this again, I would definitely use some sort of mat or waterproof paper (I’ve heard contact paper works)

The tutorial I mainly followed (the one I linked to earlier) said to use a foam roller. I tried that on my tote and it stunk. So I tried a foam brush, but that was really bad too! I finally settled on the round dabby sponge that’s in my picture, which I think was ideal. Messy on the fingers, but the best of the bunch.

I would draw grid lines for myself to help guide the placement of my stencil. I considered this but didn’t do it because I thought it would easy to just match up the edges of the pattern to keep myself straight. NOPE. My pattern started getting all wonky near the end of the second row, with the edges not matching the way they were supposed to, and by the end, I had to fill in the spots where the ends weren’t matching up.

I would also make my stencil WAY bigger, like at least four times bigger and just have the pattern repeating within my stencil. The whole process got tedious really fast, so making a bigger stencil would have saved some pain.

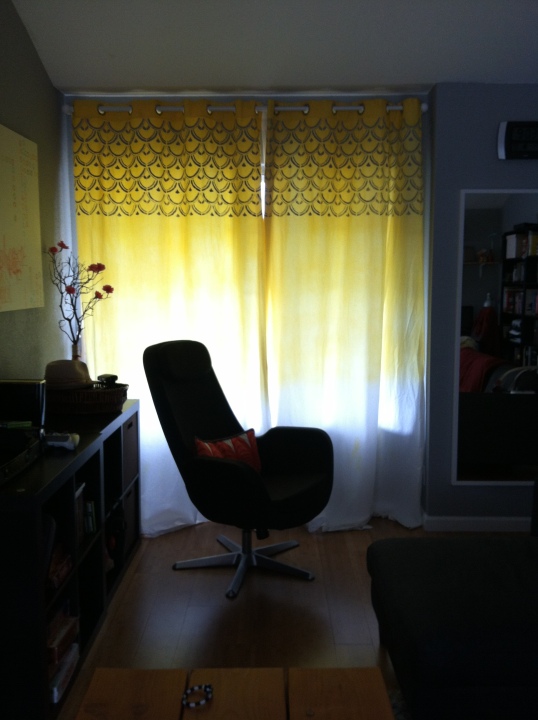
Regardless of how things could have been done better, I still get to see this every day

New folder2and it does make me happy 🙂

IMG_1792
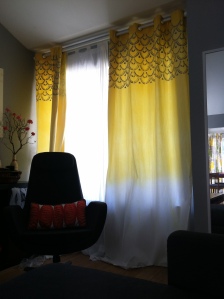
these curtains cost about $7! and a million bucks of my TIME.

The Peplum.

This is a refashion I did soon after I found out I was pregnant. It was an awkward time when my clothes, especially the pencil skirts that I favor, were getting a little tighter but the pregnancy weight just looked like, well, fat.

With a wedding looming around the corner, I had nearly nothing in my closet that fit and I was really sad about it. I needed something that would hide my belly, but still have the silhouette that worked for me. I needed. The Peplum.

This “tutorial” is actually a copy of a legitimate tutorial by Sarah of “Welcome to the G00d Life“. Her Anthropologie inspired peplum skirt is the real deal!

DSC_0567I found this skirt at goodwill for a few dollars. I knew it was the perfect candidate because it was a medium weight fabric (not too hot, not too cold), the waist was juuust the right size, and it was about 4 inches too long (you’ll know why I thought that was good in a second!)

DSC_0569

I marked where I wanted my new skirt to hit, and lopped off the bottom about a half inch below that mark (that half inch is needed to fold under twice and sew down as a new hem.) That piece I just cut off the bottom was about to become my new belly hiding peplum!

DSC_0572The 4 inch wide piece I cut off the bottom was a tube that had a raw top edge, a hemmed bottom edge, and two side seams. Basically, the idea is to take this tube and move it up to the waist to make the peplum. I cut the front of the tube (one layer of fabric – don’t cut through 2 layers of fabric!) straight up the middle, front and center, so that, if all unfurled, it would be a long strip instead of a tube. I then took the edges of the cut I had just made, and cut the bottom corners to round off into the bottom edge (the hemmed one). The last thing I did with my strip was gather the top (raw) edge to measure the same as the waist, but you could easily just pleat it (which is what Sarah did).

DSC_0571I didn’t want my peplum layer to show at all, so I carefully picked off the waistband with a seam ripper. I then positioned my new peplum on top of the skirt, making sure to match up the side seams.

DSC_0573I carefully sandwiched everything with the waistband again and secured everything with lots of pins (like, A LOT of pins!). After everything was sure not to budge, I carefully sewed the waistband back on.

DSC_0574The last step was to fold the raw edge on the bottom over twice and sew in place for a new hem. My skirt also had a lining, so I had to cut, fold, and re-hem that too 🙂

New folder1

done! I seriously love this skirt and wear it a LOT. I think it’s my most-used refashion to date! For that wedding, I wore The Peplum with another figure forgiving refashion – my elastic-in-the-back prisoner shirt.

New folder

before and after

🙂 fun!

P.S. clearly I’m crazy for peplums. you should be too.

A Lot Can Happen in a Year

Bloggy Dearest,

I’m sorry for neglecting you so.

But please do understand, because this year has been quite the whirlwind and I really have been unable to extract myself from it all to attend to you.

See the thing is, right after my last post, this happened

New folder7-001

and after that, we packed up and moved into our new place, which of course led to endless house projects

New folder8

I spy 7 DIYs….and those are only the ones I took pictures of

and THEN, we thought it would be a good idea to tackle this by ourselves

house stuff

was this a good idea? I still don’t know

Besides all that, we did some traveling and spent time with family and friends.

New folder9

graduation, oregon, tahoe, socal

But all of the above wasn’t even the crazy part. THIS was the crazy part

IMG_0636

Needless to say, I stopped timing them because I had other things on my mind

and wham-bam-slice-of-ham! he was here 🙂

New folder10-001

and the thing is, he’s been here every day.

New folder6

So you see, I’ve been busy, bloggy blog. But now that things are starting to settle, I have so many things to update you with, my phone is going to run out of memory! 🙂 So I am planning on coming back with some good stuff soon, k?

<3,

– skwuns

Take No Prisoner (Shirts)

I was inexplicably drawn to this white and blue striped shirt at Goodwill the other day, but didn't realize until I got home and tried it on that it looks like a prisoner uniform! I've tried to help you imagine what I looked like using my mad photoshop skillzzz. I needed a plan to make this shirt decidedly UN-prisoner-ly so....

FIRST I got my scissors out - I opened up the neckline, ripped off the sleeves, and brought in the sides in to be the width of my hips

SECOND I tried to make the top more fitted while also subtly breaking up the strip-iness of the shirt (I'm making up a lot of words today!). I measured and marked out four darts, pinned, and sewed them down!

Here's a close up! I was going to do this to the back too to fit my waist perfectly, but when I pinned the back darts, I found out I couldn't get it over my head! err....that won't do.

So THIRD, I tried to make the back more fitted by ruching with elastic. See how plain and square the back was? I cut a piece of elastic about an inch and a half long, and, after tacking it in the middle of the shirt, sewed it down while it was stretched out. When it's all sewn down, the elastic will naturally ruche the fabric when released!

Now the back looks like this! Three cheers for fit AND comfort AND being able to pull a shirt over your head! hurray hurrah huzzah!

The FOURTH and last stage - finishing the edges. I double rolled and hemmed up the bottom, neck hole, and arm holes. For the neck, I used this cheater technique that I'm kinda stoked about! I really wanted the look of bias tape, but totally did not want to put in the work, so after rolling toward me while the shirt was flipped inside out, I stitched as closely to the edge as a I could. I then flattened the seams open (while still inside out) and gave everything a good press.

It turned out like this! Looks like bias binding, right? heheheheh

and ta-da! Here is my new prison shirt turned spring tank. Now for the rain to stop and the sun to come out...

Before and after. Have fun!

Quickie (feat. Silver Keys)

Hello silver keys that I can hardly tell apart!


Hello nail polish/glitter collection that hardly sees the light of day!


(slather slather)


HURRAY!


Felt Blooms – Guidelines

(sigh)

I really LOVE making flowers, especially out of felt. As I watch the material slowly blossom from between my own fingertips, my heart smiles a little bit. Honestly, there are MILLIONS (ok fine, more like 531,000) of tutorials for felt flowers out there. I think they are so popular because they can be sooo quick and easy. But personally, I think a blossom that takes a little more time, planning, and effort really makes a statement.

This post isn’t so much a step by step tutorial, but more the guidelines I follow when I make a felt flower. I pretty much make them in four stages: petal cutting, petal shaping, flower assembly, and finishing touches.

Stage 1: Cut the Petals

(clockwise) pic of a peony found on google (http://4peonies.com/graphics/AbalonePearl.jpg), little squares, different colors = different sizes, petal shape

First, I pick a flower and do some “research”, which is my fancy word for doing a google image search for it. I’m basically looking for 2 things – the shape of the petals, and the fullness/density of the bloom. After this, I cut out seemingly millions of little squares in the colors I want (really, you probably only need 20 ish, depending on the flower). When I’m using different colors for a gradient effect, I try to size the petals differently to get larger as they go out. Finally, I meticulously cut each petal into the shape that I want. For this peony, I used about 20 petals, the smallest being about 4 cm wide, the largest being 6 cm wide.

STAGE 2: Shape the Petals

(clockwise) hot glue along the bottom edge, cup with thumb, backside, piles of petals!

Now, it’s time to make mounds of flat petals more lifelike! I take my hot glue gun, do a light line along the bottom edge (can you see it in the pic? 😦 ), and basically form the base of the petal into a “cup” using my thumb! REPEAT X 20

STAGE 3: Assemble the Flower

(clockwise) glue by edges, inner trio of petals, layers of petals!

Now is the fun part 🙂 I take the smallest petals and try to figure out the best formation for the smallest, inner ring of petals. I’ll try 2, 3, 4, or 5 petals to see which looks best. After I figure it out, I glue the inner ring together by the edges. I then add petals one by one, layering out, gluing by the bottom of each petal (not the edges). For this peony, I ended up having about five layers of petals, going from cream, to very light pink, to a dusty light pink.

STAGE FOUR: Apply Finishing Touches

I like to add little embellishments, like leaves, or bits of lace, tulle, or netting. Different colors, textures, and some shine really ups the visual interest. I kept the embellishments light on this baby though, just sticking with a couple of leaves 🙂

By the end, there are a couple unsightly spots, namely the center of the flower, and the back of the flower. It’s easy to fill the center! I usually just glue or stitch in some pearls, beads, or buttons. Alternatively, you can make this furry felt roll up thing by taking a thin strip of felt, cutting notches (?) down its length, and then rollllling it up, using hot glue to secure :). For the back, I figure out what I want this flower to be (pin? headband? clip? belt?) and buy the necessary hardware (Michael’s, Joann’s, Walmart!). I cut a felt circle, just big enough to hide all the ugliness, and cut slits in it to slide a part of the hardware behind it. Can you see in the above pic how the top of the hair clip is covered by the felt, and actually directly glued onto the bloom? I then thoroughly hot glue the whole thing down!

And that’s it! Flower accomplished! heehee.

My peony is a really big flower, but you can make these smaller or bigger as you please. These flowers are so fun and pretty to glue/stitch onto soft hairbands for your baby girl, or to wear as a crazy headband (like I do). They brighten up blazers, plain blouses, Bible covers, kindle covers, aprons, home decor….and uh…..lots of other stuff!!

By the way, this peony is up for mutual donation. Check out my new mutual donation page to see what that means!

🙂 Have fun!

Post Navigation